Guides - Create a Managed Database
Fully managed cloud database clusters built on top of Linode’s trusted and reliable platform.
As part of our ongoing commitment to innovation and better serving our customers, we have made the strategic decision to pause the sale of our Managed Database offering for all customers who do not have an active database deployed. We recognize the need for a product that offers higher performance and the capacity to handle more complex workloads.
If you have an existing database already deployed, you will continue to be able to deploy, provision, and manage the service exactly as you do today, and we’ll fully support your Managed Database workloads until our next-generation database solution is available. For future news and announcements related to Managed Databases, please sign up using the form on our product page.
This guide walks you through creating a Linode Managed Database through Cloud Manager.
- Open the Create Database Cluster Form in Cloud Manager
- Set the Label
- Select the Database Engine
- Select a Region
- Choose a Plan
- Determine the Number of Nodes
- Add Access Controls
- Deploy the Managed Database
Open the Create Database Cluster Form in Cloud Manager
Log in to Cloud Manager and select Databases from the left navigation menu. Click the Create Database Cluster button. This opens the Create Database Cluster page.
Set the Label
Enter a name for your cluster under Cluster Label, allowing you to easily identify it from other database clusters on your account. A good label should provide some indication as to what the database is used for. The label must be alphanumeric and between 3 and 32 characters.
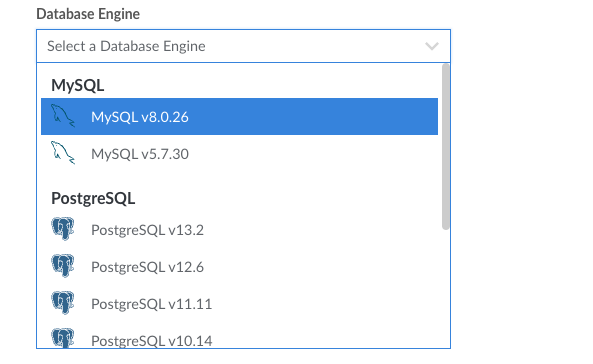
Select the Database Engine
Select the database engine you’d like to use for your new database. This setting determines the underlying database management system (DBMS) that your cluster uses. Each database engine is significantly different and you should choose the one that is required by the application you intend to use it with. For instance, WordPress requires MySQL. If you are building a custom application, work with your developers to determine the best selection. See Choosing a Database Engine and Plan to learn about each of the available database engines.

It’s recommended to select the latest database version available, unless your application requires an older version.
Select a Region
Select the region where the database cluster will reside. Regions correspond with individual data centers, each located in a different geographical area. If you will access this database from a Linode Compute Instance or LKE cluster, you should likely select the same region as those services. Otherwise, select the region closest to you and/or your customers. This helps reduce latency and can make a significant impact in connection speeds and quality.
Choose a Plan
Every node of a database cluster is built on its own Linode Compute Instance. In the Choose a Plan section, select the Compute Instance type and plan that the nodes will use. You can choose from either Dedicated CPU or Shared CPU plans. In general, Dedicated CPU plans are recommended for high-performance production databases.
Determine the Number of Nodes
Each Managed Database can be built with either 1 or 3 nodes (individual virtual machines):
- 1 node standalone database: This option is recommended for development purposes or production databases where a lower cost is more beneficial than redundancy and failover.
- 3 node high availability database cluster: This option is recommended for product databases. High availability database clusters have built-in data redundancy and automatic failover. Your data is replicated across every other node in the cluster. If one goes down, any traffic is redirected to the other available nodes.
Optionally Add Access Controls
Within the Add Access Controls section, you can specify which IP addresses (and ranges) are permitted to access your new database cluster. Each Managed Database cluster has its own access control list, which grants specific IP addresses or ranges access to the database. By default, all connections (both public and private) are blocked unless they appear on this list. See Manage Access Controls for more information and for assistance adding access controls after the database has been deployed.
If you are testing the connection from your local machine, you may also wish to enter the IP address that your ISP has assigned to your machine. One way you can find this out is by typing “What’s my IP” into Google.
Deploy the Managed Database
Once you have completed the form, click the Create Database Cluster button to start deploying your new database cluster. It takes approximately 15 to 30 minutes to fully provision the cluster. You can track the status by reviewing the Status column within the list of Database Clusters in Cloud Manager.
This page was originally published on
